Audiobooks are something of a chicken/egg dilemma for indie authors. A lot of readers (especially romance readers) only read audiobooks, so having an audiobook version of your books available can be really important for authors looking to reach new readers (as I am attempting to do). However, audiobook recording is expensive – the cost to pay someone generally starts at $3000, and only goes up from there, making it too dangerous a gamble for the majority of independent authors.
So I decided to see if I could record my own! My criteria for success: I had to be able to do it for zero monies and the end result had to be high enough quality to pass the audio checkers on Audible. (I’m not a Bezos fan, but I’ve got bills to pay.)
Now, before I go into my process, let’s acknowledge some starting advantages I have that may not be available to everyone:
- I have previous audio editing experience. I’m not a professional, but I know my way around the basics and have used Audacity a lot.
- I own a house, which means I have control over my space.
- I’m a musical theater queer, which means I have previous acting experience. As with audio editing, very much not a professional, but competent enough to get the job done.
The first hurdle: Recording
Good recording requires a good mic, which I don’t have. Thankfully, a friend of mine who podcasts off and on was in the middle of moving and was willing to lend me theirs (which was important because I can’t afford to drop $2-300 on a mic).
The mic they lent me is a solid podcasting mic, but definitely isn’t a top-tier recording mic, which created some issues because the audio standards for audiobooks are a lot higher than for podcasts. Right away I was able to get audio that would be perfectly fine for podcasts, but that had too much room echo for an audiobook.
From there, finding a setup to reduce or eliminate room echo was… challenging. I tried all kinds of things, even including recording under a blanket. (A friend who had recorded a few audiobooks created a little alcove in their space by hanging moving blankets from the ceiling, but that wasn’t an option in my space.) Finally, I talked to my sibling, who does a lot of streaming, and they pointed me toward a tool toward Nvidia Broadcast – a tool available to people with Nvidia graphics cards that comes with room echo and noise reduction filters. Basically, you install the program, start it running, and use Nvidia Broadcast as your input microphone into Audacity.
Thankfully, that helped enough to be able to get the job done.
After several hours of fucking around, here’s what I learned:
- Broadcast’s beta studio mode, while initially very promising, needs more polishing. It completely eliminated room echo, but at the cost of making my voice sound too digital, with occasional weird audio artifacting.
- Broadcast didn’t like starting recordings with hard consonants. I found that I had to say a few filler words when starting a new recording session when I had to record the title of the book no less than four times. (It kept cutting off the beginning and only getting “mmunity Witch”.)
- The audio setup that worked best in my space was sitting half in a closet with a blanket hung on the wall. Because my desktop has an Nvidia card, but my laptop doesn’t, this meant hauling my entire setup to the guest room when I wanted to record.
- Reading from an iPad on an iPad stand was far, far better for my neck than reading from my phone.
- Removing jewelry was a necessity, as I couldn’t stop myself from fidgeting with it when it was on.
- Record all of your chapters as separate tracks. It will save a lot of time and effort later.
- HUGE SANITY SAVER: Whenever I flubbed something, I would pause for five seconds before trying again. This made all of the spots with errors VISUALLY FINDABLE when scrolling through the timeline on my recordings in Audacity – extremely important as the final edited recording time was 7.5 hours.
- ANOTHER SANITY SAVER: Mark your setup with masking tape if you need to disassemble and reassemble it so it’s as close to the same as possible every time. I had to record a few things several times when the audio didn’t match.
Once I had everything recorded, it was time for….
The second hurdle: listening to myself
Once everything was recorded, I had to listen to the whole thing to identify mistakes, audio issues, etc. I made this my commute listening in the car for several days and recorded audio notes for myself when I caught things that needed to be fixed.
NGL, this is the part that sucked the most. Listening to yourself is never fun, but it extra sucks if you have voice dysphoria, like I do. (Honestly, the jury’s still out on whether all of this was worth the emotional suffering in that respect.)
Once I had my list of issues, it was on to re-recording! Again, per my sanity-savers above, marking my setup would have been helpful, because I ended up re-cording some things several times because of audio inconsistency.
Third: audio-editing
Once all of that was done, it was time to do audio editing! Without going into a ton of technical detail, the main issues I had to fix were:
Further reducing remaining room echo: I used Audacity’s Noise Reduction for this (Effect > Noise Removal and Repair > Noise Reduction) by selecting a portion with only my voice, clicking “get profile”, and then going back and running the filter on the whole track. This didn’t 100% eliminate it, but it made it Good Enough For Everyone Who’s Not Me.
Fixing the noise floor – the recording needs to be silent when the narrator isn’t speaking. Generally, this isn’t possible with a DIY setup, which requires removing that extra noise in post-processing. Again, Audacity’s Noise Reduction was able to fix this, this time by getting the profile from the “silent” portions of the track and then running Noise Reduction on the whole file.
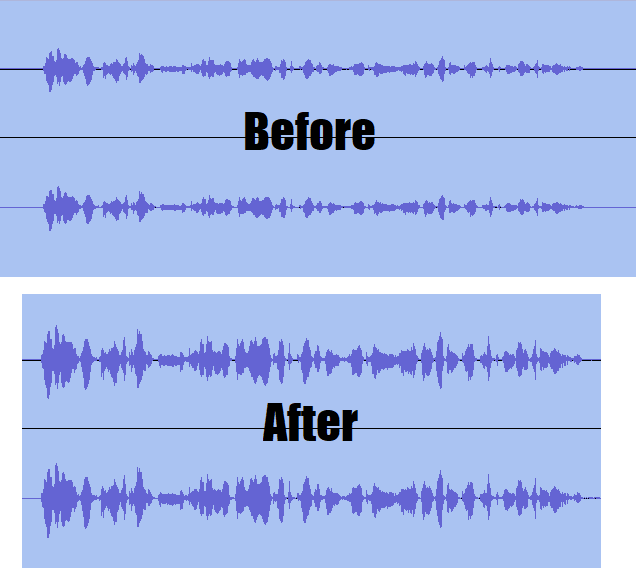
Average loudness – the standards for what is acceptable audio for a podcast and what’s acceptable for an audiobook are very different. The dynamic range (basically, the difference between the loudest sound and the quietest sound) was too big in pretty much all of my tracks. The fix for this required more steps, and the installation of a free Audacity plugin.
After some searching, I found Chris’ Dynamic Compressor – a free plugin that evens out the range of volume in tracks by bringing up the quieter parts and bringing down the louder parts. (Apologies to my audio technophiles for this extremely reductive explanation). I ran all of my tracks through this plugin first, using just the basic settings, and that helped a lot.
Here’s an example of what that looked like in Audacity:
The next step was getting my files to where the peak volume was -6db, but the RMS (average loudness) of the file was still between 18 and 23. (You don’t need to understand what that means in audio terms, the thing that’s important are the numbers themselves.)
With my example track, when I measured the RMS in Audacity (Analyze > Measure RMS) after running dynamic compression, it looked great! 22.4, which is between our target RMS values of 18 and 23! However, when I ran the tracks through ACX’s free audio checker, my peak audio exceeded -6 db, which meant it failed audio standards.
In order to fix that, I had to run a Limiter on the tracks: Effects > Volume and Compression > Limiter. (My settings screenshot below)
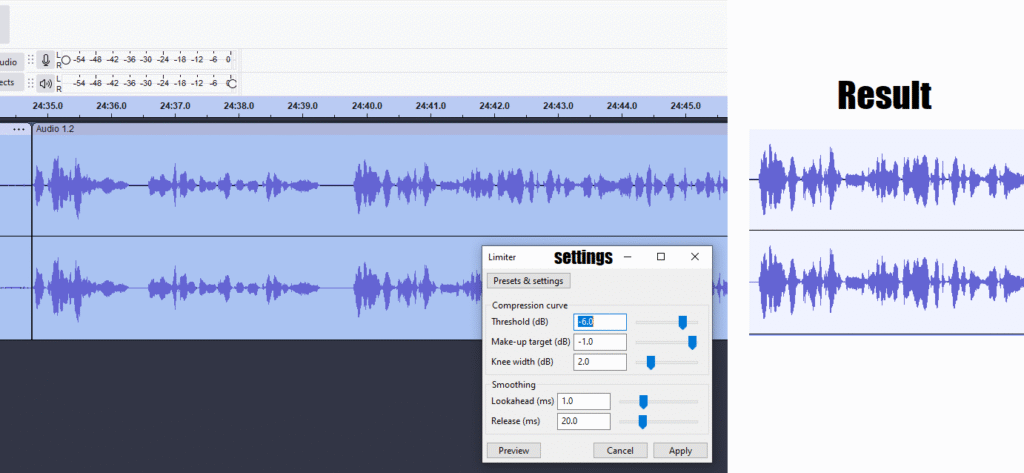
In addition to setting the noise floor at -6db, the Limiter also evened out my volume a bit more. However, now the average loudness of the track is too high – when I measure the RMS, it comes back as 17.8 – just outside our target RMS range. So now we get to run one more filter – Normalize Loudness (Effect > Volume & Compression > Loudness Normalization. Make sure that you’re normalizing RMS in the pulldown, and set your level to -20db.
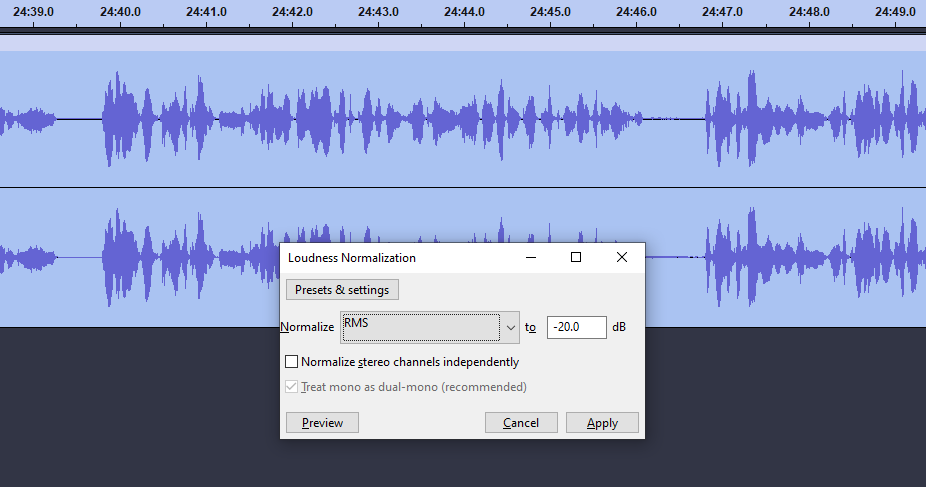
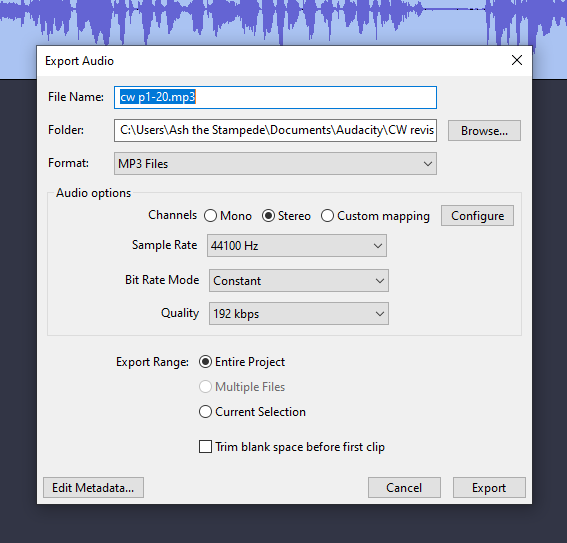
And voila – now we have a track with a noise floor of -6db and an RMS in our target range, meaning we can now output files as MP3! Which you need to do using these settings (which are not the default Audacity export settings): Stereo, with a sample rate of 44100 Hz, Constant Bit Rate Mode, and Quality of 192 kbps.
Now we can start actually publishing this sucker, right? WRONG.
LISTEN TO YOUR FINAL FILES ONE MORE TIME ALL THE WAY THROUGH
Was listening to it all over again a bit soul crushing? Yes. Do it anyway. I swore there couldn’t possibly be any errors at this point and guess what, I found five.
Fourth: Publishing
(Something I don’t discuss here: how to set your price. There’s a lot of great, easily searchable resources on how to set audiobook prices, so I’ll just urge you to do your own searching. For Community Witch, I set my MSRP at $19.99 USD.)
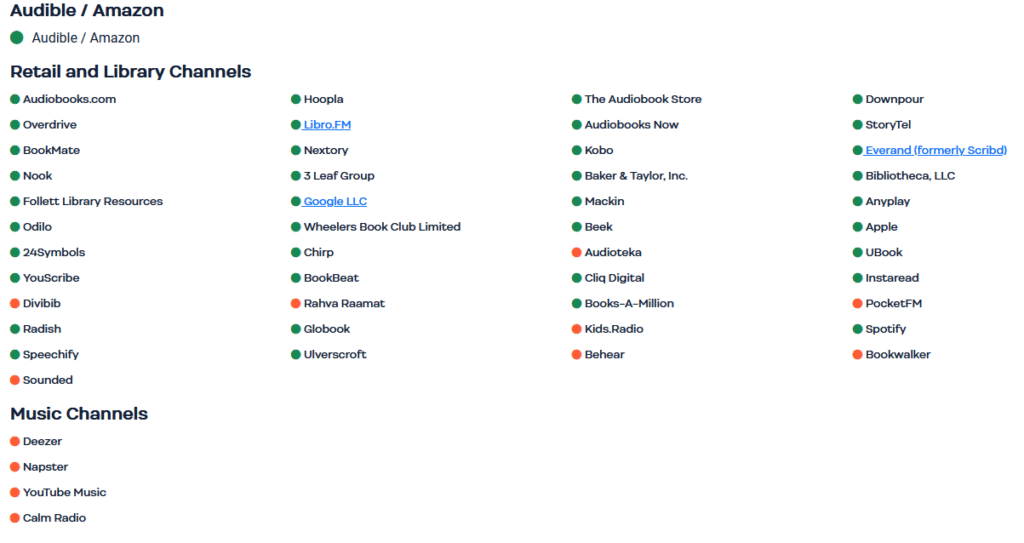
Draft2Digital doesn’t handle audiobooks, and only has a very limited partnership with Apple and Spotify, so after some research I ended up going with Author’s Republic, which is basically like the Draft2Digital of audiobooks, except they push to a lot more platforms. Their royalty rates are only 80%, but with my ADHD it was worth sacrificing 20% to have them handle the back end for pushing to this many partners:
However, when it came time to set up my audiobook, I learned a few more things!
- Audiobook covers are square, which required some irritating fucking around with my cover in Canva to get something that worked
- Your Intro and Outtro have to be their own separate files
- Your title in the track has to match the copy on your title EXACTLY
Once everything was set up, I submitted it all for final review and… it failed audio standards! Thankfully, Author’s Republic has a lot of solid resources on how to correct various issues, so it didn’t take long to figure out how to fix it. What did take a long time was individually opening 29 tracks, running the correction, and re-outputting the files. Then, because AR’s interface could use some improvements, I had to delete all my existing tracks individually before I could upload new ones.
Then finally, finally, it passed.
Except, lol nope it’s not over, because now I have to actually fucking promote it.
Which is where this guide runs out, because that’s the nut I’m trying to crack right now.
So. Was it worth it? Reply hazy, ask again later
Honestly, I don’t know yet. From start to finish, I’d estimate this project took between 80 and 90 hours – which makes that $3000 starting rate for audiobook recording make a lot more sense. Now, I’ll be able to cut that time probably by about 40% for next time, if I decide to do it again, but will I decide to do it again? I don’t know. In order to even reimburse myself for my time at Ontario’s minimum wage rate, I’d need to net about $1100 USD, which is about 69 copies sold at full price. Currently, I have yet to even sell my first copy. Though admittedly, I’ve been holding off on promoting it until now since the publication delay is a hilariously unuseful “5 to 60 days”.
What I can say is that this project occupied the majority of my “working” hours for about four weeks, and was frustrating, emotionally draining, and dysphoric, so I very much hope that over time the audiobook gets enough traction to feel like it wasn’t a wasted effort.
Lastly: the obligatory capitalism
I’m an unemployed trans romance author whose “day job” profession of content and SEO marketing has been replaced by genAI, so unfortunately my ability to produce more such content comes down to capitalism. If you found this even marginally helpful, I hope you’ll consider tipping me a few bucks on Ko-Fi.